Every morning across America, millions of drivers turn the key in their high-mileage vehicles, only to be met with a momentary, heart-sinking clatter. This metal-on-metal rattling, commonly known as a dry start, is the silent killer of older engines, stripping away vital components long before the vehicle reaches optimal operating temperature. Modern automotive advice aggressively dictates that thick oil additives are universally harmful, claiming they disrupt the delicate balance of contemporary, low-viscosity synthetic blends. However, this blanket narrative fundamentally ignores the shifting physics inside an engine block that has surpassed the 100,000-mile mark, where factory-spec fluids simply drain away too quickly overnight.
The secret to extending the life of your aging daily driver isn’t found in buying more expensive, ultra-thin synthetic oils, but rather in a specific, heavily debated habit adopted by master mechanics. By simply substituting exactly one quart of your standard motor oil with a specialized, high-viscosity petroleum blend, you fundamentally alter the fluid dynamics within the crankcase. This hidden habit forces a protective, clingy film to remain suspended on top-end parts—like camshafts and lifters—long after the engine is shut off, effectively neutralizing dry start damage before the key is even turned.
The Mechanics of a Dry Start: Why Modern Oils Fail High-Mileage Engines
As an engine surpasses the 100,000-mile threshold, the microscopic tolerances between moving metal components begin to expand. This natural wear process disrupts the state of hydrodynamic lubrication, a technical term describing the critical fluid barrier that prevents metal-to-metal contact. Modern automotive advice aggressively pushes ultra-thin, low-viscosity synthetic oils engineered for brand-new engines with exceptionally tight clearances. However, when these watery synthetic blends are poured into an older, worn engine block, they fail to maintain a durable boundary layer. Once the engine is shut off for the night, the thin oil rapidly drains back into the oil pan, leaving vital top-end components completely exposed. The next morning, the engine suffers a ‘dry start,’ where metal grinds against metal for critical seconds before the oil pump can push fluid back to the top.
- Symptom: Intense rattling or ticking upon cold start = Cause: Complete oil drain-back leaving lifters and camshaft lobes unlubricated.
- Symptom: Blue smoke from the tailpipe upon ignition = Cause: Worn valve seals allowing residual, low-viscosity oil to seep into the combustion chamber overnight.
- Symptom: Decreased oil pressure at idle = Cause: Widened bearing clearances that thin oil can no longer properly fill or pressurize.
- Symptom: Accelerated metal shavings in the oil filter = Cause: Repeated dry start friction progressively shaving microscopic layers from the valvetrain.
Understanding these specific diagnostic symptoms is the critical first step, but identifying the precise fluid dynamic shift needed to permanently correct them requires a closer look at your engine’s individual wear profile.
Evaluating Your Engine’s Candidacy for Viscosity Intervention
Not all vehicles require the same aggressive fluid strategy. Recognizing where your specific vehicle falls on the mechanical wear spectrum is essential for applying the correct protective measures. The intervention required for a brand-new commuter car differs entirely from the survival tactics necessary for a seasoned pickup truck towing heavy loads across the sweltering highways of Texas or the freezing mountain passes of Colorado.
| Target Audience / Engine Profile | Current Mileage | Primary Mechanical Issue | Expected Benefit of Intervention |
|---|---|---|---|
| The Seasoned Commuter | 100,000 – 150,000 Miles | Occasional morning ticking, minor oil consumption. | Eliminates top-end dry start noise and stabilizes pressure. |
| The Heavy-Duty Hauler | 150,000 – 200,000 Miles | Thermal breakdown under load, noticeable valvetrain clatter. | Reduces operating temperatures and thickens boundary layer. |
| The Vintage Survivor | 200,000+ Miles | Severe blow-by, low idle pressure, chronic dry starts. | Seals worn rings, stops blow-by, and cushions worn bearings. |
Once you have accurately classified your engine’s exact state of mechanical fatigue, you are fully prepared to implement the one specific maintenance habit that can reverse the trajectory of internal wear.
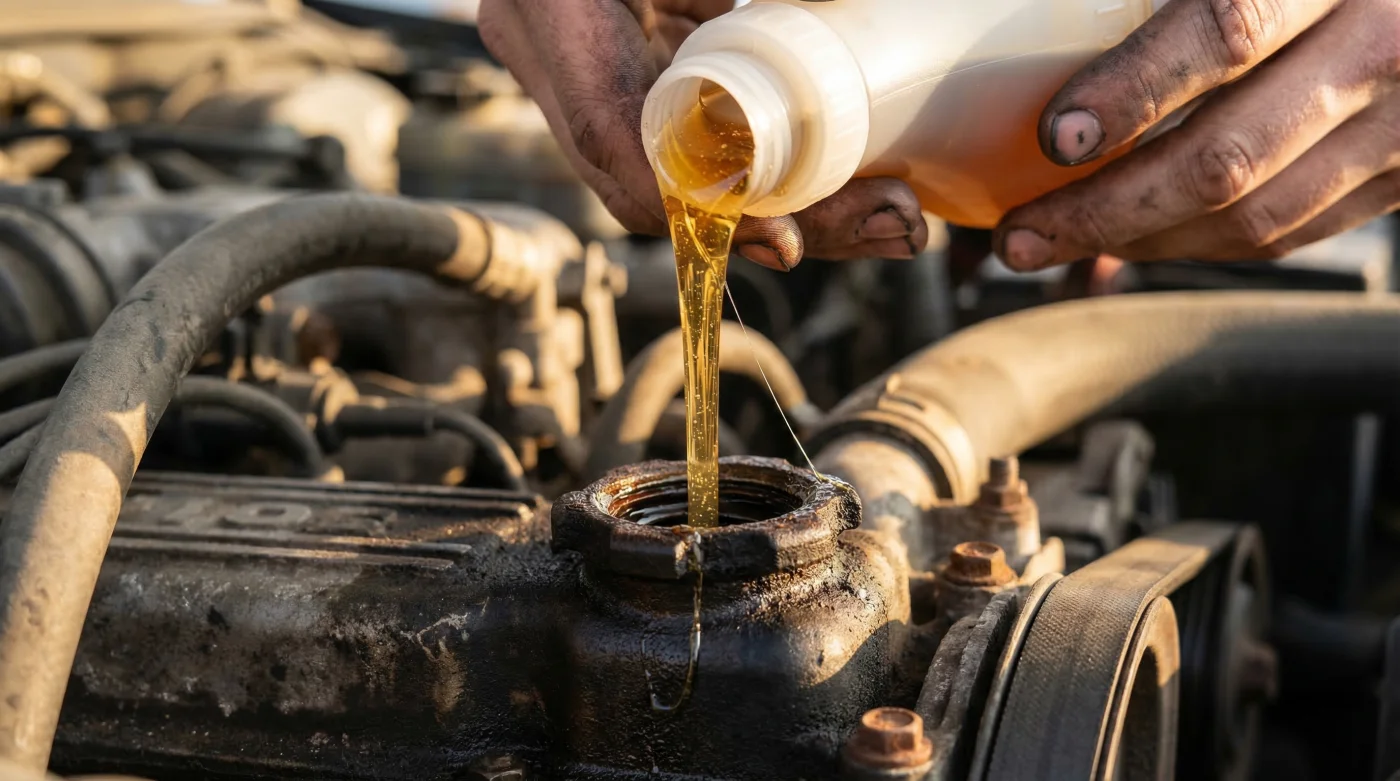
The Hidden Habit: How a Single Substitution Changes Everything
- Brake Parts Cleaner Sprayed Inside Throttle Bodies Melts Internal Electronics
- Bryan Cranston shaves Hal’s body while nude in new Malcolm trailer
- Federal Trade Commission Outlaws Dealership Widespread Aftermarket Engine Part Warranty Denials
- Mormon Wives’ Mikayla Matthews reveals childhood sexual abuse triggered her marital intimacy collapse
- A rare turtle washed ashore in Texas and what covered its shell shocked rescuers
To execute this lubrication strategy safely and effectively without over-pressurizing the oil system, one must adhere rigidly to the specific volumetric dosing protocols validated by tribology experts.
Scientific Data and Precision Dosing Parameters
Substituting oil volumes requires exact mathematical ratios to maintain the correct viscosity index. Too little stabilizer, and the oil will continue to drain back into the pan; too much, and the fluid becomes too dense for the oil pump to distribute efficiently in freezing temperatures. The standard protocol for engines operating in ambient temperatures above 30 degrees Fahrenheit dictates a strict 20 percent replacement ratio.
| Total Engine Oil Capacity | Standard Motor Oil Volume | Lucas Heavy Duty Oil Stabilizer Volume | Target Treatment Ratio |
|---|---|---|---|
| 4 Quarts | 3.2 Quarts | 0.8 Quarts (25.6 oz) | 20 Percent Replacement |
| 5 Quarts | 4 Quarts | 1 Quart (32 oz) | 20 Percent Replacement |
| 6 Quarts | 4.8 Quarts | 1.2 Quarts (38.4 oz) | 20 Percent Replacement |
| Heavy Duty / Diesel (10 Quarts) | 8 Quarts | 2 Quarts (64 oz) | 20 Percent Replacement |
Mastering the science of these precise viscosity ratios leads directly to making informed, confident decisions in the auto parts aisle, where not all thickeners are created equal.
Quality Guide: Navigating the Additive Market
The market is flooded with chemical solvents and cheap thickeners that falsely promise to rebuild engines. True protection relies on physical fluid dynamics rather than harsh chemical detergents that can swell seals and eventually cause catastrophic blowouts. When implementing this protocol, you must differentiate between pure petroleum stabilizers that physically cushion parts and aggressive chemical flushes that strip away beneficial varnish.
| What To Look For (The Gold Standard) | What To Avoid (The Engine Killers) | Progression Plan for Implementation |
|---|---|---|
| 100% pure petroleum formulas without harmful solvents. | Products containing Teflon, PTFE, or aggressive detergents. | Start with a 20% ratio at your next scheduled oil change. |
| High film strength capable of surviving extreme thermal loads. | Thin friction modifiers that do not increase film thickness. | Monitor oil pressure gauge for a steady 10-15% increase at idle. |
| Compatibility with both synthetic and conventional oils. | Stop-Leak products designed to artificially swell rubber seals. | Increase to a maximum 25% ratio if dry start ticking persists. |
With a clear understanding of what makes a high-quality intervention successful, the final phase is executing the exact physical steps required to integrate the stabilizer into your engine block safely.
Implementing the Protocol: A Step-by-Step Guide for Your Next Oil Change
Achieving the perfect blend requires more than simply pouring a bottle into the valve cover. Because Lucas Heavy Duty Oil Stabilizer is exceptionally dense, it requires proper thermal preparation. Ensure the ambient temperature is at least 60 degrees Fahrenheit, or store the bottle in a warm room prior to the oil change to dramatically improve its flow rate. First, drain your old oil completely and change the filter as usual. When refilling, pour the precise volume of your standard motor oil first. Then, slowly pour the pre-measured quart of stabilizer into the engine. The slow pour allows the thick petroleum to gracefully coat the upper valvetrain components as it descends into the oil pan. Immediately start the engine and let it idle for exactly five minutes; this allows the oil pump to thoroughly homogenize the mixture, pushing the newly stabilized fluid into every microscopic crevice and bearing clearance.
Following these exact physical parameters transforms a standard maintenance chore into a precise, highly effective mechanical intervention that actively shields your vehicle.
The Final Verdict: Protecting Your Automotive Investment
In an era where the cost of vehicle replacement is astronomical, maximizing the lifespan of your current engine is the most financially sound decision a driver can make. While modern conventional wisdom continues to blindly recommend ultra-thin oils for every scenario, the physics of a high-mileage engine demand a completely different approach. By rejecting the myth that all thickeners are harmful, and instead strategically substituting one quart of Lucas Heavy Duty Oil Stabilizer, you physically alter the environment inside your engine block. You eliminate the metal-on-metal terror of a dry start, restore lost compression, and establish an uncompromising boundary of hydrodynamic lubrication that remains exactly where it is needed, night after night.
Read More