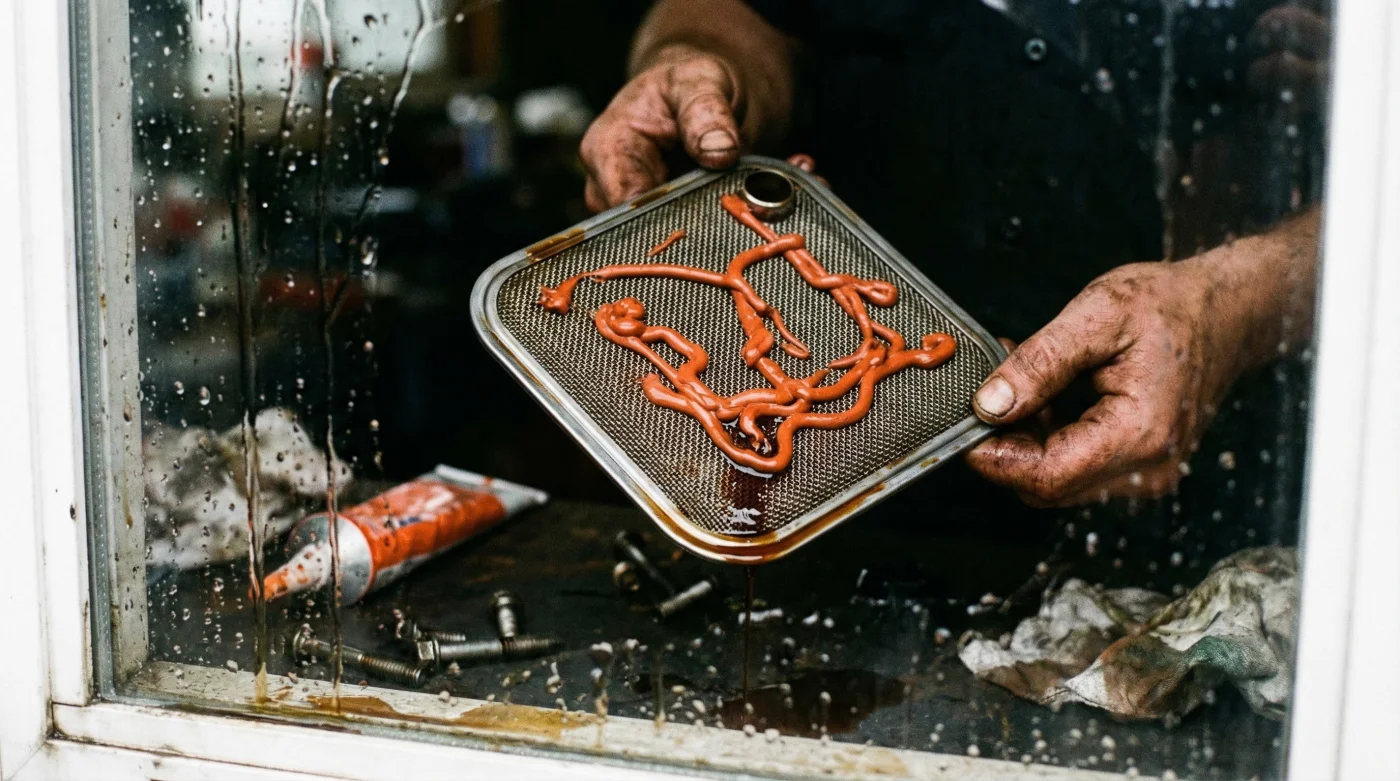
For decades, backyard mechanics and seasoned garage veterans alike have relied on a seemingly foolproof method to seal a weeping transmission pan. When the standard rubber or cork gasket feels inadequate against the relentless drip of red fluid on the concrete driveway, the immediate instinct is to reach for a heavy tube of liquid sealant to guarantee a leak-proof seal. The logic feels sound: more material means a tighter barrier against leaks. However, this deeply ingrained habit is quietly triggering catastrophic gearbox failures across the country, turning a routine $50 maintenance weekend into a $4,000 rebuilding nightmare.
A recent diagnostic breakthrough contradicts the long-held belief that extra sealant prevents pan leaks, revealing that this hidden habit is actually a ticking time bomb for your vehicle’s hydraulic system. By applying a thick layer of sealant, DIYers are unknowingly initiating a fatal chain reaction inside the transmission case that systematically chokes off the lifeblood of the entire drivetrain. To understand why your transmission might suddenly slip, shudder, or fail right after a fresh fluid change, we must look at exactly what happens when that sticky paste cures in the dark and breaks away.
The Anatomy of a Transmission Failure
The use of RTV Silicone (Room Temperature Vulcanizing silicone) is ubiquitous in automotive repair because it handles high temperatures and fills microscopic imperfections in metal surfaces effortlessly. However, transmission pans operate under entirely different constraints than an oil pan or a heavy-duty differential cover. Modern automatic transmissions are highly sensitive hydraulic networks relying on precise line pressures and completely unimpeded fluid flow. The automatic transmission fluid (ATF) acts as a lubricant, a coolant, and a hydraulic medium simultaneously. When foreign debris enters this delicate ecosystem, the results are immediate and severe.
Diagnostic Breakdown: Symptom = Cause
- Symptom: High-pitched whining noise from the transmission pump upon cold startup. = Cause: Cavitation caused by a partially restricted fluid pickup tube struggling to draw fluid through a blocked screen.
- Symptom: Delayed or harsh engagement when shifting from Park to Drive. = Cause: Sluggish hydraulic pressure building too slowly behind heavily clogged internal fluid filters.
- Symptom: Sudden loss of all motive power at highway speeds (neutral drop). = Cause: Total pump starvation as a massive chunk of cured silicone is sucked upward, entirely blocking the primary filter inlet.
| Target Audience | Common Sealing Habit | Benefit of Adopting Proper Protocol |
|---|---|---|
| DIY Enthusiasts | Applying thick beads of RTV Silicone to reuse flattened, old gaskets. | Prevents accidental fluid starvation and saves thousands in total rebuild costs. |
| Independent Shop Techs | Using sealant to speed up turnaround times on transmission services. | Eliminates frustrating comeback jobs, liability claims, and protects shop reputation. |
| Performance Builders | Combining high-tack adhesive sprays with messy silicone blobs. | Ensures maximum line pressure for crisp, reliable shifting under heavy loads. |
Uncovering the exact physics behind this hydraulic suffocation requires a closer look at what happens the moment you torque down those pan bolts.
How Excess Sealant Triggers Hydraulic Starvation
The core of the issue lies in the geometric reality of metal flanges and mechanical clamping force. When you smear a thick bead of RTV Silicone onto the lip of the pan, the immense pressure of tightening the bolts causes the viscous material to compress and expand outward in both directions. While the exterior squeeze-out is easily wiped away with a shop rag, the interior squeeze-out is left entirely unchecked and out of sight. Inside the pan, this excess material forms a protruding, jagged lip of cured rubber. As the transmission operates, the fluid reaches extreme temperatures, often exceeding 200 degrees Fahrenheit, and acts as a mild solvent.
- Brake Parts Cleaner Sprayed Inside Throttle Bodies Melts Internal Electronics
- Bryan Cranston shaves Hal’s body while nude in new Malcolm trailer
- Federal Trade Commission Outlaws Dealership Widespread Aftermarket Engine Part Warranty Denials
- Mormon Wives’ Mikayla Matthews reveals childhood sexual abuse triggered her marital intimacy collapse
- A rare turtle washed ashore in Texas and what covered its shell shocked rescuers
| Silicone Bead Size | Internal Squeeze-Out Length | Hydraulic Pressure Drop | Estimated Time to Failure |
|---|---|---|---|
| 1/16 inch (Correct if mandated) | 0.5 millimeters | 0% (Nominal) | N/A (Safe) |
| 1/8 inch (Common Mistake) | 4.0 millimeters | 15% to 25% Reduction | 5,000 Miles |
| 1/4 inch (Dangerous Excess) | 8.5 millimeters + Immediate Breakage | 60% to 100% Reduction | Under 500 Miles |
Knowing the exact tolerances of your transmission’s hydraulic pathways leads directly to the question of how to seal the pan correctly without relying on dangerous chemical pastes.
The Proper Gasket Protocol and Quality Standards
Automakers engineer modern transmission pans to use highly specific dry gaskets, utilizing advanced materials like elastomeric rubber, dense cellulose paper, or rigid steel-core composites. When installing a new gasket, meticulous surface preparation is non-negotiable. The mating surfaces must be completely devoid of old adhesive, requiring careful scraping with a plastic razor blade and thorough treatment with non-chlorinated brake parts cleaner until you can see bare, perfectly shiny aluminum or stamped steel. Even a microscopic layer of oily residue can compromise the mechanical seal of a dry gasket.
The Top 3 Rules for Installation
- Rule 1: Strict Torque Dosing. Never use an air or electric impact wrench to tighten a transmission pan. Utilize a freshly calibrated 1/4-inch drive torque wrench and tighten pan bolts to exactly 100 to 120 inch-pounds (consult your specific factory service manual). Always work in a crisscross or star pattern to prevent the sheet metal pan from warping.
- Rule 2: The Dry Fit Mandate. High-quality modern gaskets demand a strictly dry installation. Do not add any form of liquid sealant, polyurethane glue, or RTV Silicone unless explicitly mandated by the original factory service manual.
- Rule 3: Temperature Curing Parameters. If you are working on a specific transmission designed entirely without a traditional gasket (requiring an approved anaerobic sealer), you must allow the sealant to cure at a minimum ambient temperature of 72 degrees Fahrenheit for a full 24 hours before introducing any transmission fluid into the system.
| Quality Guide | What to Look For (The Gold Standard) | What to Avoid (The Red Flags) |
|---|---|---|
| Gasket Material | Rigid steel-core rubber gaskets with built-in metal compression limiters. | Flimsy, rolled-up cork gaskets that easily tear, shrink, or deform. |
| Sealant Usage | Zero sealant; strictly dry installation relying on the gasket’s natural tension. | Thick, continuous beads of brightly colored aftermarket silicone sealant. |
| Hardware Condition | Clean, un-stretched bolts matched with incredibly flat, undeformed pan rails. | Overtightened, stretched bolts creating deep dimples in the sheet metal flange. |
Mastering these mechanical sealing principles ensures your transmission fluid flows freely, but you must also know how to undo the damage safely if the wrong methods were already applied by a previous owner.
Reversing Contamination and Next Steps
If you recently serviced your transmission and realize you used excessive sealant, you are effectively racing against the clock before internal damage becomes permanent. The very first step is to drain the fluid, drop the transmission pan again, and perform a thorough forensic inspection. Look closely for any stringy rubber remnants clinging to the inside of the pan lip or floating in the residual fluid. Most importantly, you must remove the internal fluid filters entirely and discard them. Do not attempt to clean or back-flush a silicone-contaminated filter; the microscopic synthetic fiber mesh inside will trap the rubber particles forever, permanently reducing the flow rate and starving the pump.
Replace the compromised filter with a brand-new, high-quality OEM equivalent. Re-clean both mating surfaces with a precision scraper, taking extreme care to ensure no gouges are left in the soft aluminum transmission housing. Reinstall the pan using a premium dry gasket following the strict torque dosing outlined previously. Finally, refill the unit with the exact factory specification of automatic transmission fluid, measuring down to the precise quart and verifying the temperature to avoid dangerous aeration and foaming.
Understanding these precise recovery steps prepares you for your next critical maintenance interval, ensuring your drivetrain remains bulletproof for the long road ahead.
Read More