Imagine cruising down the interstate on a frigid winter morning, the heater blasting to combat the 20-degree Fahrenheit air, when suddenly your headlights dim, the radio cuts out, and the dreaded red battery icon illuminates your dashboard. Most drivers immediately panic, bracing themselves for a tow truck and a jaw-dropping quote for a completely fried alternator. This exact scenario plays out thousands of times every season across the United States, yet the root cause is almost never a genuinely defective charging unit, but rather a silent, invisible chemical reaction happening under the hood.
The secret to avoiding this $600 automotive nightmare doesn’t require advanced mechanical skills, expensive aftermarket electrical upgrades, or hours waiting in a specialized repair shop. Instead, a simple, three-dollar household ointment applied through a specific, five-minute physical modification acts as an impenetrable shield against the corrosive off-gassing that silently strangles your vehicle’s electrical system.
The Invisible Culprit Silently Killing Your Charging System
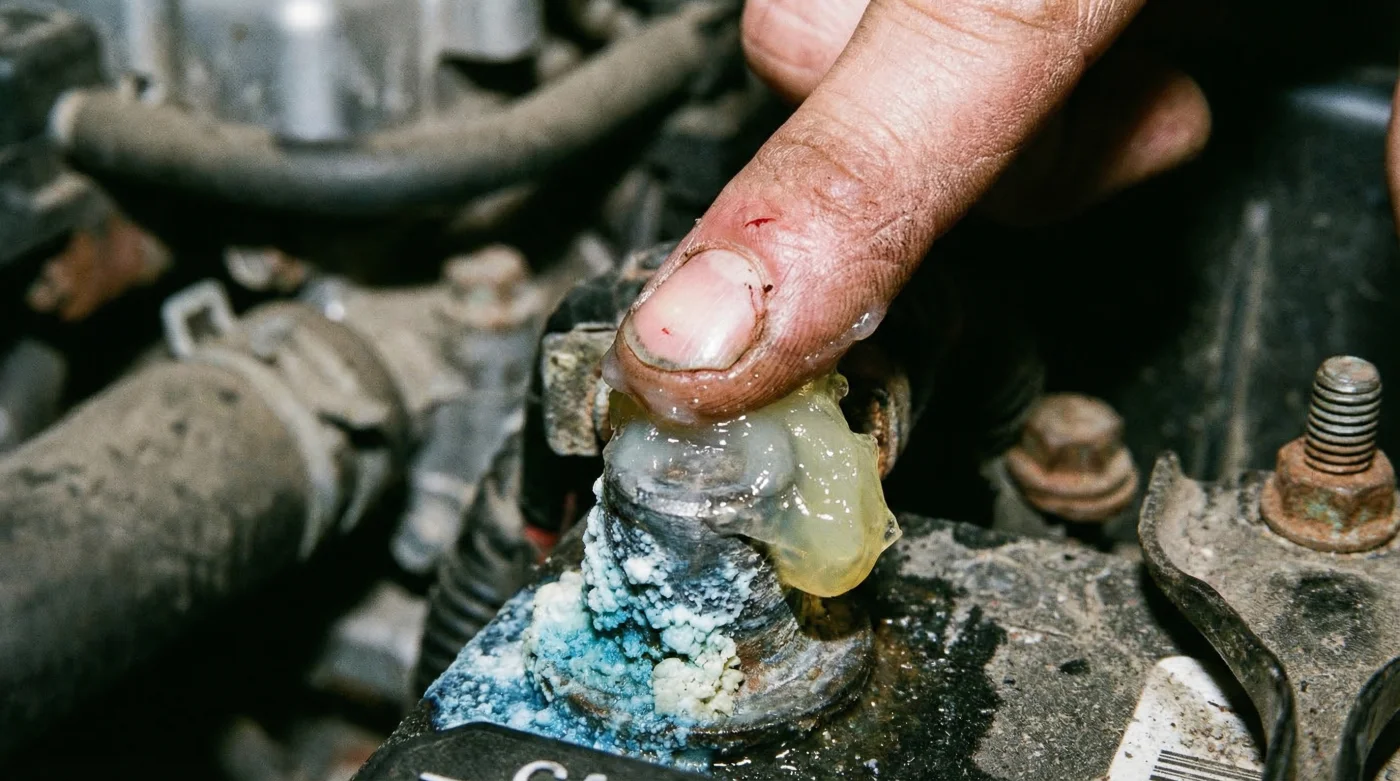
Every time you turn the key, your lead-acid battery undergoes a violent internal chemical reaction to provide hundreds of amps to the starter motor. During normal charging and discharging cycles, the battery vents invisible, highly acidic gas—specifically hydrogen sulfide. Because this gas is heavier than the ambient air under your hood, it settles directly onto the exposed metal of your Battery Terminals.
When this acidic vapor mixes with ambient humidity and engine heat, it rapidly triggers a process of galvanic corrosion. This manifests as that powdery, crusty white, blue, or green buildup you often see around the battery posts. This crust is not just an aesthetic issue; it is a highly resistant electrical insulator. As the resistance builds up, your alternator must work twice as hard to push voltage through the blockage to keep the battery charged. This constant state of maximum output causes the internal diodes and voltage regulator of the alternator to literally cook themselves to death.
To diagnose if your charging system is currently under attack by this invisible gas, look for these specific warning signs:
- Symptom: Dimming headlights when idling = Cause: Alternator is struggling to push current through early-stage micro-corrosion on the terminals.
- Symptom: Slower-than-normal engine cranking = Cause: High resistance at the terminal connection is choking off the necessary 200+ cold cranking amps.
- Symptom: A faint sulfur or rotten egg smell near the grille = Cause: Excessive hydrogen sulfide off-gassing, indicating immediate terminal protection is required.
- Symptom: Random electrical gremlins (radio resetting, sensors flashing) = Cause: Voltage drops and spikes caused by an intermittent, heavily oxidized connection.
To stop this destructive chain reaction, we must introduce a physical barrier that fundamentally alters the environment around the electrical connections.
How a Basic Household Item Stops Electrical Hemorrhaging
The ultimate defense against this acidic onslaught is surprisingly found in most household medicine cabinets: pure petroleum jelly, or its automotive equivalent, dielectric grease. By heavily coating the Battery Terminals with this thick, hydrophobic (water-repelling) substance, you create an oxygen-deprived environment. Corrosion cannot exist without oxygen and moisture.
When the hydrogen sulfide gas vents from the battery casing, it attempts to bond with the lead and copper components of your wiring harness. However, the petroleum jelly acts as an impenetrable physical wall. The gas simply bounces off the grease and dissipates safely into the engine bay air current, completely neutralizing the threat to your alternator. Experts advise that applying this barrier is the single most cost-effective preventative maintenance task a vehicle owner can perform.
| Driver Profile | Primary Risk Factor | Protective Barrier Benefit |
|---|---|---|
| The Short-Trip Commuter | Frequent starting draws heavy amps, but short drives prevent full recharging, increasing acid venting. | Prevents the rapid onset of lead-sulfate crystallization on the posts. |
| Extreme Climate Drivers | Temperatures below 32 degrees Fahrenheit or above 90 degrees Fahrenheit force the alternator to max capacity. | Seals the metal from temperature-induced condensation and humidity. |
| Off-Road / Rural Drivers | High vibration and heavy dust exposure compromise factory electrical connections. | Traps dust on the outer layer of the grease, keeping the inner electrical contact pristine. |
Fortunately, the chemical mechanism behind this preventative barrier is backed by decades of electrical engineering data.
The Scientific Mechanics of Anti-Corrosion Compounds
- CRC throttle body cleaner instantly strips essential factory Teflon idle coatings.
- Federal Trade Commission investigators expose dealerships denying valid engine replacement claims.
- ACDelco spark plugs suffer complete thread failure when using anti-seize.
- Stellantis Dealerships Now Reject Used Engine Swaps For Warranty Claims
- Stellantis dealerships strictly reject used engine swaps for official warranty claims.
Many backyard mechanics mistakenly believe they should put the grease between the battery post and the cable clamp. This is a critical error. Because the grease is an insulator, placing it between the mating surfaces will actually increase electrical resistance. The scientific protocol dictates that the metal-to-metal connection must be perfectly clean and tightly clamped first, and then the grease is applied completely over the top of the entire assembly, encapsulating it from the outside air.
| Technical Property | Scientific Metric / Dosing | Mechanism of Action |
|---|---|---|
| Dielectric Strength | Withstands > 10,000 Volts per millimeter | Prevents stray voltage leakage across the battery casing. |
| Thermal Stability | Maintains viscosity up to 140 degrees Fahrenheit | Will not melt and run off the terminals during standard engine operating temperatures. |
| Hydrophobicity | 0% water absorption rate | Completely blocks atmospheric moisture from triggering oxidation on the copper rings. |
| Application Dosing | Apply a uniform 2-millimeter to 3-millimeter thick layer | Provides sufficient mass to absorb microscopic engine vibrations without breaking the airtight seal. |
Now that the science is clear, executing the actual modification requires precision and the correct preparation sequence to ensure long-lasting protection.
The Ultimate Protocol for Protecting Your Battery Terminals
To properly perform this modification, you must start with a chemically neutral surface. If you apply petroleum jelly over existing corrosion, you will simply trap the acid against the metal, accelerating the damage to your alternator. Follow this exact dosing and timing sequence for professional-grade results.
Step 1: The Chemical Neutralization Wash
Begin by mixing an exact ratio of 1 tablespoon of standard baking soda into 8 ounces of warm distilled water. Disconnect the negative (black) cable first, followed by the positive (red) cable. Pour this alkaline solution directly over the bare Battery Terminals and the cable clamps. You will see an immediate bubbling reaction as the baking soda neutralizes the sulfuric acid. Wait exactly 3 to 5 minutes for the reaction to completely cease.
Step 2: Mechanical Abrasion
Using a specialized wire terminal brush, aggressively scrub the lead posts and the inside of the copper clamps until the metal is brightly shining. Wipe the entire area completely dry with a lint-free microfiber cloth. Any residual moisture left behind will compromise the final seal.
Step 3: Encapsulation
Reconnect the cables—positive first, negative second—and tighten them to the manufacturer’s torque specifications (usually around 10 to 15 foot-pounds). Take a generous scoop of petroleum jelly or dedicated dielectric grease. Using a gloved finger, massage the grease over the entire connection. Ensure you apply a solid 2-millimeter thick coating that covers the base of the post, the clamp, and the first inch of the exposed copper wire entering the clamp.
| Product Category | What to Look For (The Gold Standard) | What to Avoid (The Danger Zone) |
|---|---|---|
| Household Ointments | 100% Pure White Petroleum Jelly (no fragrances or additives). | Lotions, water-based creams, or anything containing alcohol. |
| Automotive Greases | Pure Silicone Dielectric Grease (high thermal resistance). | White Lithium Grease (will melt and degrade plastic battery casings). |
| Cleaning Agents | Pure Sodium Bicarbonate (Baking Soda) and Distilled Water. | Harsh industrial degreasers or bleach (can react violently with battery acid). |
Once this protective layer is properly installed, your vehicle’s electrical resilience will immediately step into a new tier of reliability.
Long-Term Maintenance for Peak Electrical Performance
Studies show that a properly encapsulated charging connection can extend the life of an alternator by up to 40%. However, the intense environment under a vehicle’s hood means this is not a permanent, one-time fix. Extreme ambient temperatures, engine vibration, and road debris will eventually degrade the outer surface of the petroleum jelly barrier.
Experts advise performing a visual inspection of your Battery Terminals every 10,000 miles, or coinciding with every second oil change. If the grease appears black, heavily crusted with dirt, or begins to thin out, simply wipe it away with a paper towel and reapply a fresh 2-millimeter layer. You do not need to perform the full baking soda wash unless you see active white or green corrosion returning.
By maintaining this simple physical modification, you effectively blindfold your electrical system to the harsh realities of off-gassing and humidity, serving as the ultimate bridge to years of worry-free driving.
Read More