You are driving down the interstate, the radio playing softly, when suddenly the dreaded check engine light flickers on your dashboard. Most drivers habitually ignore this amber warning, assuming it is merely a minor emissions glitch or a loose gas cap that can safely wait until the next routine oil change. But beneath your floorboards, a silent, catastrophic chemical chain reaction is already taking place—one that is actively melting down one of the most mechanically complex and expensive components in your entire vehicle.
The underlying culprit is rarely aggressive driving or purchasing cheap, low-octane gasoline. The hidden destroyer is actually a small, naturally aging probe mounted directly in your exhaust system that has quietly become lazy over thousands of miles. When this exact component loses its precise electrical calibration, it inadvertently initiates a devastatingly hot fuel fire that transforms a simple maintenance item into a gut-wrenching $2,000 repair bill. Here is exactly what is happening under the hood, and how identifying the true state of your sensors can stop this financial and mechanical disaster before your exhaust system is physically incinerated.
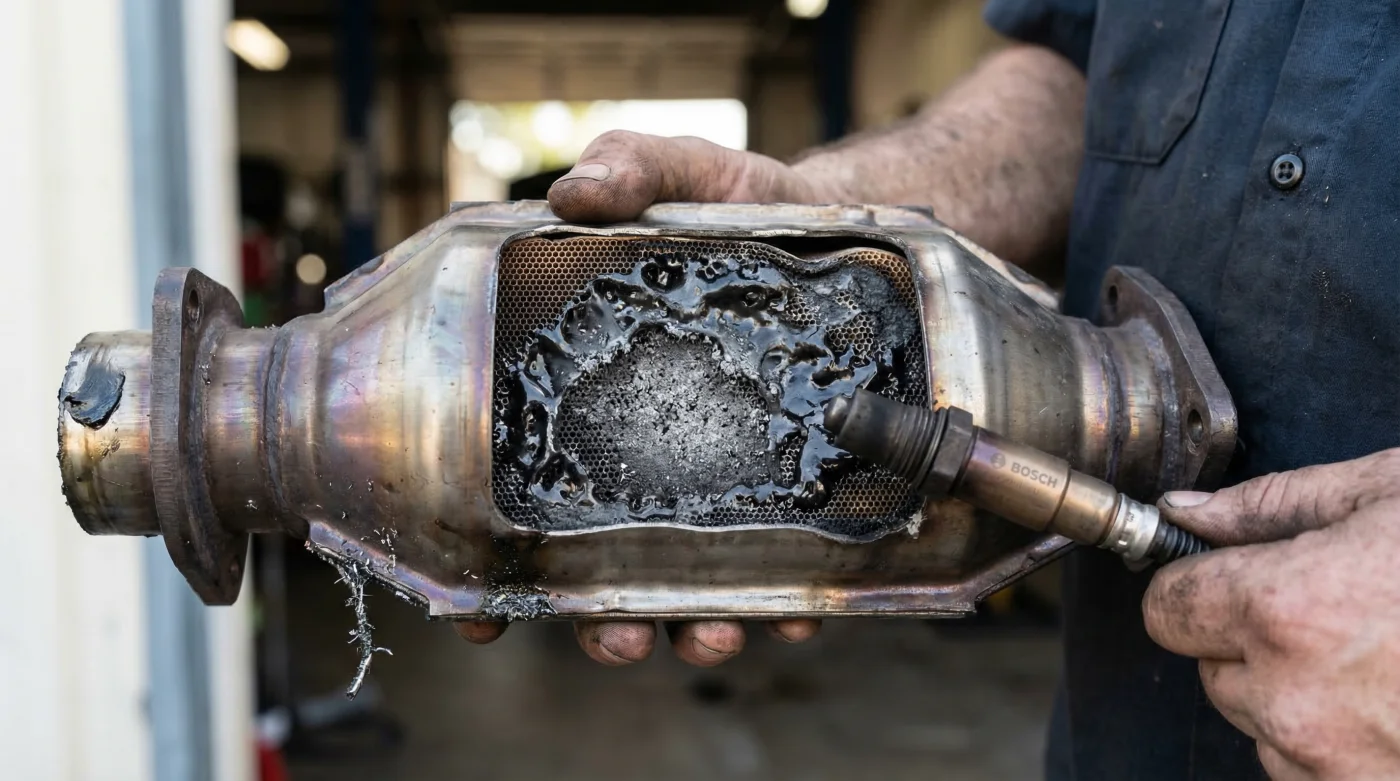
The Science of the Meltdown: How Raw Fuel Destroys Precious Metals
To understand how a tiny piece of hardware can annihilate a massive exhaust component, we have to look at the delicate balance of your engine’s internal combustion. Your engine strives for the perfect stoichiometric ratio—exactly 14.7 parts of air to 1 part of fuel. The guardian of this golden ratio is your primary oxygen sensor. However, as the platinum-coated tip of the sensor gets covered in carbon and silica deposits over years of driving, its reaction time severely degrades. Automotive experts refer to this as a lazy sensor. Instead of rapidly toggling its voltage, it gets stuck reading a falsely lean condition.
When the engine control module receives this delayed, false lean signal, it panics. It immediately compensates by dumping excess fuel into the combustion chamber. This state of running rich pushes raw, unburned gasoline directly out of the exhaust valves and straight into the catalytic converter. The converter, designed to scrub trace emissions, suddenly acts as a secondary combustion chamber. The raw gasoline ignites upon hitting the converter’s internal cordierite ceramic honeycomb. Temperatures artificially spike from a normal operating range of 800 degrees Fahrenheit to well over 2,000 degrees Fahrenheit, physically melting the expensive platinum, palladium, and rhodium internals into a useless, clogged block of slag.
| Driver Symptom | Underlying Chemical Action | Long-Term Consequence |
|---|---|---|
| Rotten egg smell | Hydrogen sulfide production | Total catalytic converter failure |
| Plunging fuel economy | Maximum fuel trim default | Severe carbon buildup on piston rings |
| Sluggish acceleration | Clogged ceramic honeycomb | Exhaust back-pressure destroying valves |
But recognizing these severe consequences is only half the battle; understanding the exact electrical degradation of these components is what truly empowers you to save your engine.
Diagnostic Depth: Decoding the Lazy Sensor Syndrome
Modern engine management relies entirely on rapid electrical feedback. A healthy sensor constantly oscillates between 0.1 volts (lean) and 0.9 volts (rich) multiple times per second. This rapid switching is what keeps the fuel trim tightly regulated. However, thermal cycling and chemical contamination eventually compromise the microscopic pores of the zirconium dioxide element inside the sensor housing. When this occurs, the switching frequency drops from several times per second to merely once every few seconds.
This delay is the exact window where your catalytic converter is flooded with raw fuel. High-level diagnostic studies show that even a 100-millisecond delay in sensor response time can increase tailpipe emissions and exhaust temperatures by nearly 15 percent. Because the sensor hasn’t technically failed completely or produced a dead-flat voltage reading, the check engine light often remains off during the early, most destructive phases of this meltdown. You must look for the physical symptoms to diagnose the root cause accurately.
- Symptom: Unexplained drop in gas mileage = Cause: The engine control unit is operating in an open-loop failsafe, defaulting to maximum fuel delivery.
- Symptom: Dark soot around the tailpipe = Cause: Incomplete combustion leaving heavy carbon deposits that bypass the overwhelmed catalytic converter.
- Symptom: A glowing red exhaust pipe = Cause: Raw fuel is actively igniting inside the catalytic converter body, creating a localized inferno.
| Metric | Healthy Specification | Failing Lazy Specification |
|---|---|---|
| Voltage Range | 0.1V to 0.9V | 0.3V to 0.6V (Narrowed) |
| Switching Rate | 3 to 5 times per second | Less than 1 time per second |
| Heater Resistance | 2 to 4 Ohms (Rapid heating) | Over 10 Ohms (Delayed closed-loop) |
- CRC throttle body cleaner instantly strips essential factory Teflon idle coatings.
- Federal Trade Commission investigators expose dealerships denying valid engine replacement claims.
- ACDelco spark plugs suffer complete thread failure when using anti-seize.
- Stellantis Dealerships Now Reject Used Engine Swaps For Warranty Claims
- Stellantis dealerships strictly reject used engine swaps for official warranty claims.
The Intervention: Why Engineers Rely on Bosch Oxygen Sensors
When it is time to replace this critical component, automotive technicians and master mechanics overwhelmingly advise against utilizing unbranded, discount aftermarket parts. The variance in manufacturing tolerances on cheap sensors often introduces the exact same delayed voltage readings you are trying to cure. This is precisely why industry experts specifically recommend genuine Bosch Oxygen Sensors for a complete factory-level restoration. As the original inventors of the automotive oxygen sensor in 1976, Bosch has continuously refined the technology to withstand the brutal environment of modern high-compression engines.
Genuine Bosch Oxygen Sensors feature a proprietary double-laser welded stainless steel body that makes them completely submersible and highly resistant to contamination. Furthermore, their exclusive refined zirconium ceramic thimble guarantees the fastest light-off times in the industry, meaning your engine switches into its highly efficient closed-loop fuel mapping significantly faster than with standard replacements. This rapid response completely eliminates the rich-fuel dumping phase that threatens your catalytic converter.
| Component Feature | Premium Standard | Discount Aftermarket Red Flags |
|---|---|---|
| Outer Shell | Double-laser welded stainless steel | Crimped mild steel (prone to rust) |
| Internal Element | Purified zirconium dioxide | Mixed low-grade ceramics |
| Harness Connectors | Exact-fit OEM matched | Splicing required (universal fit) |
| Response Time | Under 100 milliseconds | Over 300 milliseconds |
Knowing exactly what tier of replacement part to purchase is essential, but executing the actual replacement with clinical precision is what ensures your engine remains bulletproof for the next decade.
Actionable Execution: The 3-Step Protection Protocol
Replacing your oxygen sensors is a straightforward procedure that can save you thousands of dollars in secondary catalytic converter repairs, provided you follow a strict sequence of operations. Do not wait for a complete failure; preventative maintenance is your best shield against thermal exhaust damage.
Step 1: Pre-Diagnostic Heat Check
Utilize a modern OBD2 scanner to monitor live data streams, specifically looking at Bank 1, Sensor 1. Graph the voltage output. If the wave resembles a slow, rolling hill rather than sharp, rapid jagged spikes, your sensor is actively failing. Furthermore, scan for pending codes like P0133 (Slow Response), which often log in the background long before the check engine light illuminates.
Step 2: The 60,000-Mile Preventative Rule
Automotive experts universally recommend replacing upstream primary sensors every 60,000 to 100,000 miles. Because these sensors are subjected to extreme heat cycles, they often seize in the exhaust manifold. To prevent stripping the delicate threads, apply a high-quality penetrating fluid to the base of the sensor 24 hours prior to removal. Run the engine for exactly 3 minutes to slightly warm the metal, expanding the bung and allowing the sensor to break loose with less sheer force.
Step 3: Verifying the Fuel Trim
After successfully installing your new Bosch Oxygen Sensors, it is absolutely critical to clear the engine control module’s learned memory. Disconnect the negative battery terminal for 15 minutes or use a scanner to reset the fuel adaptations. Drive the vehicle for 50 miles in varying conditions to allow the computer to learn the new, rapid voltage signals. You will immediately notice a sharper throttle response and an uptick in your average gas mileage.
By taking proactive control of this single, easily accessible exhaust probe, you completely neutralize the hidden threat actively hunting your expensive emissions systems.
The truth is that catalytic converters rarely die a natural death; they are almost always murdered by upstream engine management failures. Allowing a degraded, sluggish sensor to control your fuel delivery is akin to throwing hundred-dollar bills directly into your tailpipe. By recognizing the early warning signs of a failing mixture ratio and investing in precision-engineered components, you safeguard your vehicle’s performance, protect the environment, and keep your hard-earned money out of the mechanic’s register.
Read More