Picture this: You are sitting at a red light, and your steering wheel is vibrating so violently it physically numbs your hands. Your dashboard rattles, your teeth chatter, and you immediately assume the worst—a catastrophic engine misfire, failing spark plugs, or a severely clogged throttle body. You spend hundreds of dollars on aggressive tune-ups, chasing a phantom mechanical failure, but the harsh, aggressive idle remains completely unchanged.
The truth is, modern automotive diagnostics often overlook the fundamental physical anchor of your entire powertrain. When the structural integrity of this hidden foundation fails, the rotational energy of your engine transfers directly into your vehicle’s cabin. But automotive engineers and track-day insiders have a closely guarded secret. Instead of dropping hundreds of dollars on factory replacements that will inevitably fail again, there is a ten-dollar chemical hack that completely restores and upgrades this foundation, eliminating vibrations permanently. The secret lies in a simple tube of liquid window urethane.
The Anatomy of Powertrain NVH and Structural Failure
To understand why this ten-dollar hack works, we first have to analyze how rotational force interacts with your chassis. Every time your spark plugs ignite, miniature explosions force pistons down, creating massive torque. Your engine mounts are the only barrier keeping that violent kinetic energy from tearing your car apart. Factory mounts are typically constructed from vulcanized natural rubber or are filled with hydraulic fluid to absorb these shockwaves—a concept engineers refer to as NVH (Noise, Vibration, and Harshness) reduction.
However, natural rubber has a fatal flaw. Over tens of thousands of miles, exposure to extreme under-hood ambient temperatures exceeding 200 degrees Fahrenheit, combined with inevitable engine oil drips and sheer mechanical stress, causes the rubber to dry rot, crack, and tear. When the rubber webbing inside the mount breaks, the metal core makes direct contact with the outer metal bracket, sending raw, unmitigated engine vibrations straight through the steering column. Before you invest in electronic diagnostics, you must verify the physical integrity of your Polyurethane Engine Mounts.
Diagnostic Guide: Symptom = Cause Troubleshooting
- Symptom: Severe steering wheel vibration only while the vehicle is in ‘Drive’ with your foot on the brake. = Cause: Torn primary lower torque strut or collapsed front engine mount allowing metal-to-metal contact under engine load.
- Symptom: A loud, metallic ‘clunk’ from the engine bay when abruptly stepping on or off the gas pedal. = Cause: Completely sheared motor mount causing the engine block to physically lift and slam back down onto the subframe.
- Symptom: Unexplained exhaust leaks or rapid failure of flexible exhaust joints. = Cause: Excessive engine movement over-extending the exhaust flex-pipe beyond its operational limits.
- Symptom: Difficult or grinding gear shifts in manual transmissions during hard acceleration. = Cause: Degraded transmission mounts causing the drivetrain to twist out of alignment with the shift linkage.
By upgrading to a polymer-based solution, drivers can permanently bypass the inherent weaknesses of organic rubber.
| Target Audience / Driver Profile | Standard Rubber Mounts (OEM) | Upgraded Liquid Polyurethane Mounts |
|---|---|---|
| Daily Commuter (High Mileage) | Provides softest idle, but requires replacement every 60,000 miles due to heat degradation. | Eliminates engine slop, lasts the lifetime of the vehicle, initial slight idle vibration. |
| Performance / Track Enthusiast | Allows too much engine twist, resulting in wheel hop and lost torque transfer to the pavement. | Locks down the drivetrain, delivering instantaneous throttle response and eliminating wheel hop. |
| Budget DIY Mechanic | Costs $100-$300 per mount. Requires specialized presses to extract and install new bushings. | Costs $10-$15 total. Can be injected directly into the existing cracked mount housing at home. |
Understanding the fundamental flaws of factory rubber leads us directly to the chemical science behind the ultimate permanent fix.
The Science of Shore Hardness and Vibration Transfer
- CRC throttle body cleaner instantly strips essential factory Teflon idle coatings.
- Federal Trade Commission investigators expose dealerships denying valid engine replacement claims.
- ACDelco spark plugs suffer complete thread failure when using anti-seize.
- Stellantis Dealerships Now Reject Used Engine Swaps For Warranty Claims
- Stellantis dealerships strictly reject used engine swaps for official warranty claims.
Studies show that automotive-grade liquid polyurethane cures to a specific durometer—a technical measurement of a material’s resistance to permanent indentation. While factory rubber typically hovers around 45 to 50 on the Shore A hardness scale, liquid windshield urethane cures to a solid 60A to 70A. This specific rating is the absolute sweet spot. It is rigid enough to prevent the engine core from moving and tearing under heavy acceleration, yet yielding enough to absorb the microscopic, high-frequency vibrations that cause dashboard rattling at red lights. The chemical cross-linking of the polyurethane elastomer makes it virtually impervious to motor oil, transmission fluid, and high engine bay temperatures.
| Polymer Material Type | Shore Hardness Rating | Scientific Mechanism / Dosing Output | Optimal Use Case |
|---|---|---|---|
| OEM Natural Rubber | 45A – 50A | High flex, low thermal threshold. Begins molecular breakdown at 180 Fahrenheit. | Strictly for luxury cars prioritizing absolute silence over longevity. |
| Liquid Windshield Urethane | 60A – 70A | Medium flex, high chemical resistance. Cures via ambient moisture in the air. | The perfect balance of daily drivability and permanent powertrain stabilization. |
| Solid Aftermarket Polyurethane | 80A – 90A | Minimal flex. Transfers extreme NVH. Withstands extreme torsion forces. | Dedicated track cars and competitive drag racing only. |
Mastering this chemical balance is the crucial first step before beginning the physical restoration process.
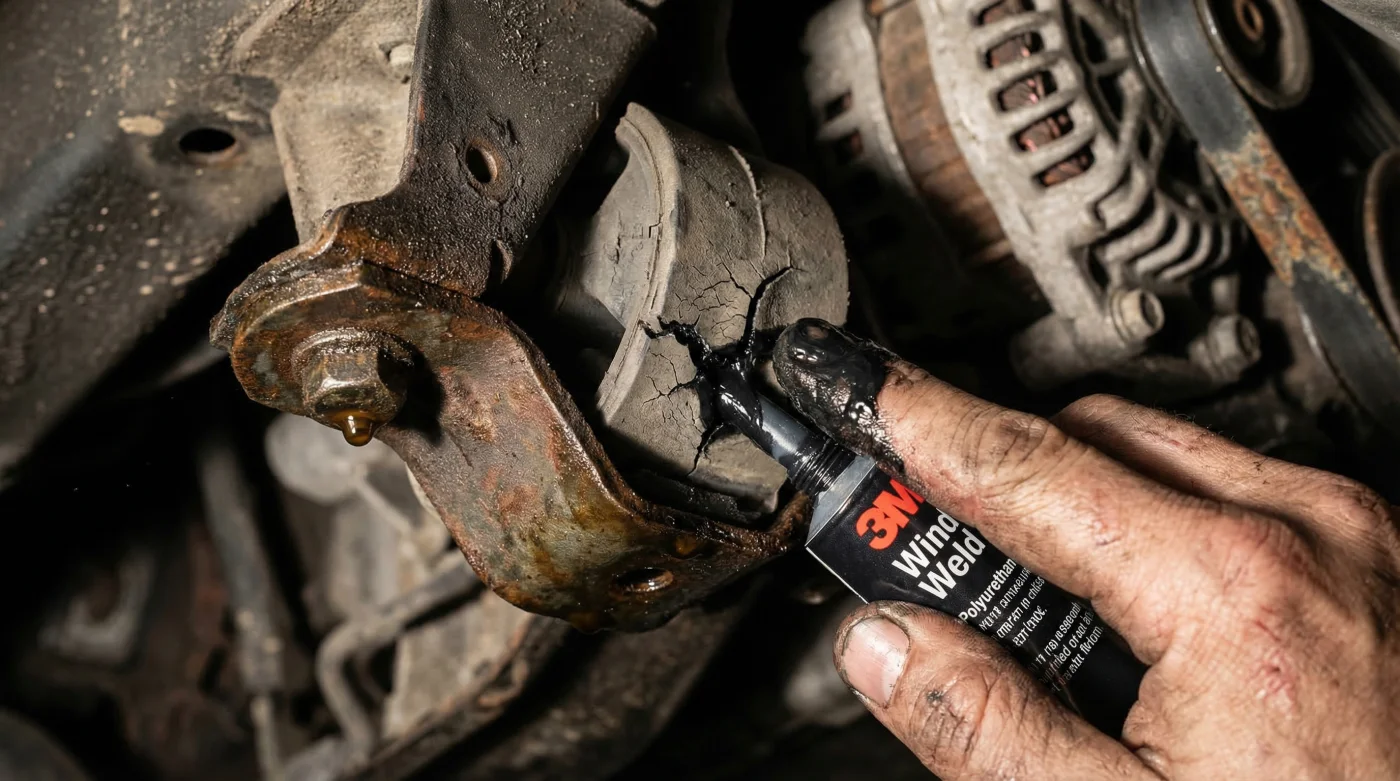
The Ten-Dollar Urethane Hack: Step-by-Step Restoration
Executing this technique requires precision and patience, but the return on investment is unmatched. To create indestructible Polyurethane Engine Mounts, you must first remove the worn mount from your vehicle. Once extracted, the primary goal is not to remove the old, torn rubber, but to use it as an anchoring matrix for the new liquid polymer.
The Restoration Protocol
Begin by aggressively cleaning the entire mount. Organic oils and road grime will prevent the urethane from bonding. Flood the mount with non-chlorinated brake parts cleaner and scrub it with a wire brush until the remaining rubber is bone dry and slightly scuffed. Next, lay the mount flat on a piece of cardboard and seal one side of the open gaps completely with heavy-duty aluminum tape or duct tape. This acts as a dam to prevent the liquid urethane from leaking out before it solidifies.
Using a standard caulking gun, inject the liquid urethane into the voids of the mount. Experts advise pressing the nozzle deep into the cracks of the old rubber to force out any trapped air bubbles. Overfill the mount slightly, then use a plastic putty knife or a gloved finger dipped in soapy water to smooth the surface level with the metal casing. The dosing and curing environment is critical here: the optimal curing temperature is 70 degrees Fahrenheit with moderate humidity, as urethane requires moisture from the air to catalyze the curing process. Allow a strict minimum of 48 to 72 hours of undisturbed curing time before reinstalling the mount into the vehicle.
| Quality Metric | What To Look For (Best Practices) | What To Avoid (Common Failures) |
|---|---|---|
| Material Selection | Automotive-grade windshield urethane (e.g., 3M Windo-Weld 08609). 10.5 fluid ounce tube. | Standard silicone caulk, household construction adhesive, or expanding foam. |
| Preparation | Thoroughly degreased surfaces. Scuffed rubber internals for maximum chemical adhesion. | Leaving oil residue. Removing the factory rubber core entirely, which breaks center alignment. |
| Curing Process | 70 Fahrenheit ambient temperature, high humidity, full 72-hour rest period off the vehicle. | Baking in an oven (causes boiling/air bubbles) or installing while the core is still soft. |
Following this precise application method ensures the polymer bonds at a molecular level, setting the stage for decades of flawless performance.
Professional Break-In and Longevity Expectations
Once you bolt your newly minted Polyurethane Engine Mounts back onto the subframe and torque them to factory specifications, your initial test drive will be a revelation. The engine will instantly feel physically connected to the gas pedal. Because the powertrain can no longer twist backward, 100 percent of your engine’s torque is forced directly into the transmission and out to the drive wheels. You will notice noticeably crisper shifts and zero hesitation off the line.
It is important to manage expectations during the break-in period. For the first 500 miles, you may experience a slight increase in low-frequency NVH—a mild hum in the cabin when the air conditioning compressor kicks on at a dead stop. This is perfectly normal. As the polyurethane elastomer experiences thermal cycling from the heat of the engine bay, it will subtly temper and soften just enough to absorb those micro-vibrations while retaining its structural armor. By utilizing this ten-dollar hack, you have successfully upgraded your powertrain foundation to outlast the life of the vehicle, banishing the phantom misfire and rough idle forever.
Read More