There is no feeling quite as terrifying for a car owner as pulling the dipstick on a high-mileage vehicle and finding it completely bone dry. Most drivers immediately assume that a sudden, massive spike in oil consumption is an undeniable death sentence for their engine, signaling completely worn piston rings, deteriorating valve guides, or an impending $4,000 engine rebuild. This widespread misconception causes countless Americans to prematurely trade in their perfectly functional vehicles or waste hundreds of dollars on thick, ‘stop-leak’ oil additives that do absolutely nothing to solve the root mechanical problem.
But what if this terrifying symptom isn’t actually a catastrophic internal failure at all? Master mechanics and automotive engineers advise that a severely overlooked, incredibly cheap plastic component hidden deep under the hood is almost always the true culprit behind sudden oil loss. This tiny, ten-dollar mechanism quietly controls internal engine pressure, and when neglected, it literally forces quarts of liquid oil directly into the combustion chamber to be burned away, creating a cloud of smoke and a whole lot of unnecessary panic.
Decoding the Internal Pressures of Your Engine
To understand why your daily commuter is suddenly burning a quart of oil every 500 miles, we must look at a critical emissions control device known as the PCV Valve. The term stands for Positive Crankcase Ventilation, a system developed to handle the inevitable leakage of combustion gases that slip past the piston rings during normal operation. This leakage, scientifically classified as blow-by, creates immense pressure inside the lower half of the engine block. If this pressure is not aggressively vented and routed back into the intake manifold to be safely burned, the engine will literally choke on its own internal atmosphere.
| Driver Profile | Common Misdiagnosis | Immediate Benefit of Replacement |
|---|---|---|
| High-Mileage Commuter (Over 100k Miles) | Worn Piston Rings / Dying Engine | Instant halt to sudden oil burning and restored fuel economy. |
| Stop-and-Go City Driver | Failing Valve Cover Gaskets | Elimination of internal pressure blowouts and weeping oil leaks. |
| Heavy Duty / Towing Operator | Blown Rear Main Seal | Prevention of catastrophic pressure-induced seal failure under load. |
Understanding exactly who benefits from this rapid repair is just the beginning; knowing the precise scientific failure taking place inside the engine block is absolutely crucial.
The Scientific Mechanics of Positive Crankcase Ventilation
The PCV Valve is not just a hollow tube; it is a precisely calibrated, spring-loaded plunger that relies on manifold vacuum to regulate airflow based on engine load. At idle, when manifold vacuum is high (typically around 18-22 inHg), the plunger is pulled partially closed to restrict flow and prevent a lean misfire. During heavy acceleration, when vacuum drops, the spring forces the valve open to allow maximum extraction of crankcase vapors. When the valve becomes hopelessly clogged with carbon and sludge, it permanently jams in either the open or closed position. A stuck-closed valve acts like a cork in a boiling kettle, forcing oil vapor to violently push past rubber gaskets, while a stuck-open valve acts like a heavy-duty shop vacuum, literally sucking liquid oil straight out of the cylinder head and dumping it into the intake tract.
| Operating Condition | Manifold Vacuum (inHg) | Valve Position & Flow Rate | Technical Consequence of Failure |
|---|---|---|---|
| Engine Idle | 18 – 22 inHg | Partially Closed (Low Flow) | Rough idle and unmetered air leaks if stuck open. |
| Light Cruising | 10 – 15 inHg | Mid-Position (Moderate Flow) | Gradual oil consumption and carbon buildup on intake valves. |
| Heavy Acceleration | 0 – 5 inHg | Fully Open (Maximum Flow) | Extreme crankcase pressure spikes blowing out the rear main seal. |
Once the scientific mechanism of this pressure regulation is clear, the next critical step is identifying the exact warning signs your specific vehicle is displaying.
Diagnostic Guide: Symptom Equals Cause
Before you tear down your engine or spend thousands at a dealership, you must perform a basic symptomatic analysis. Automotive diagnostic experts rely on a direct correlation between the visual warning signs and the mechanical failures of the Positive Crankcase Ventilation system. If your vehicle is exhibiting any of the following behaviors, the ten-dollar valve is your primary suspect.
- Symptom: Thick blue smoke billowing from the exhaust pipe exclusively during a cold morning startup. = Cause: Oil pooling inside the intake manifold overnight due to a stuck-open valve continuously siphoning liquid oil while driving.
- Symptom: Fresh oil weeping from the valve cover gasket, spark plug tube seals, or the oil pan. = Cause: Excessive crankcase pressure from a completely blocked valve physically blowing out the weakest rubber seals in the engine block.
- Symptom: A rough, vibrating idle accompanied by a ‘Check Engine’ light displaying lean misfire codes (P0171 or P0174). = Cause: Unmetered, uncalculated atmospheric air bypassing the mass airflow sensor and entering the intake tract via a cracked ventilation hose or shattered valve housing.
- Symptom: The oil dipstick drops from ‘Full’ to ‘Add a Quart’ in less than 1,000 miles with no visible drips on your driveway. = Cause: The engine is atomizing and internally combusting its own lubrication supply through a compromised ventilation channel.
- Misty Copeland removes the traditional pointe shoes for a new look
- Maya Rudolph confirms the SNL exit after the final Oscar sketch
- Leonardo DiCaprio wins his second Oscar and ignores the crowd
- Power Coolant Flush Machines Quietly Ruin Older Engine Water Pump Seals
- ACDelco Spark Plugs Fail Instantly Applied With Standard Anti-Seize Compound
How to Test and Replace the Component
You do not need an advanced degree in automotive engineering to verify the health of your ventilation system. The diagnostic process requires zero specialized tools, takes less than 10 minutes, and can be performed right in your own driveway while the engine is at its normal operating temperature of approximately 212 degrees Fahrenheit. Always wear safety glasses and thick mechanics gloves when working near hot engine components.
The Top 3 Diagnostic Steps
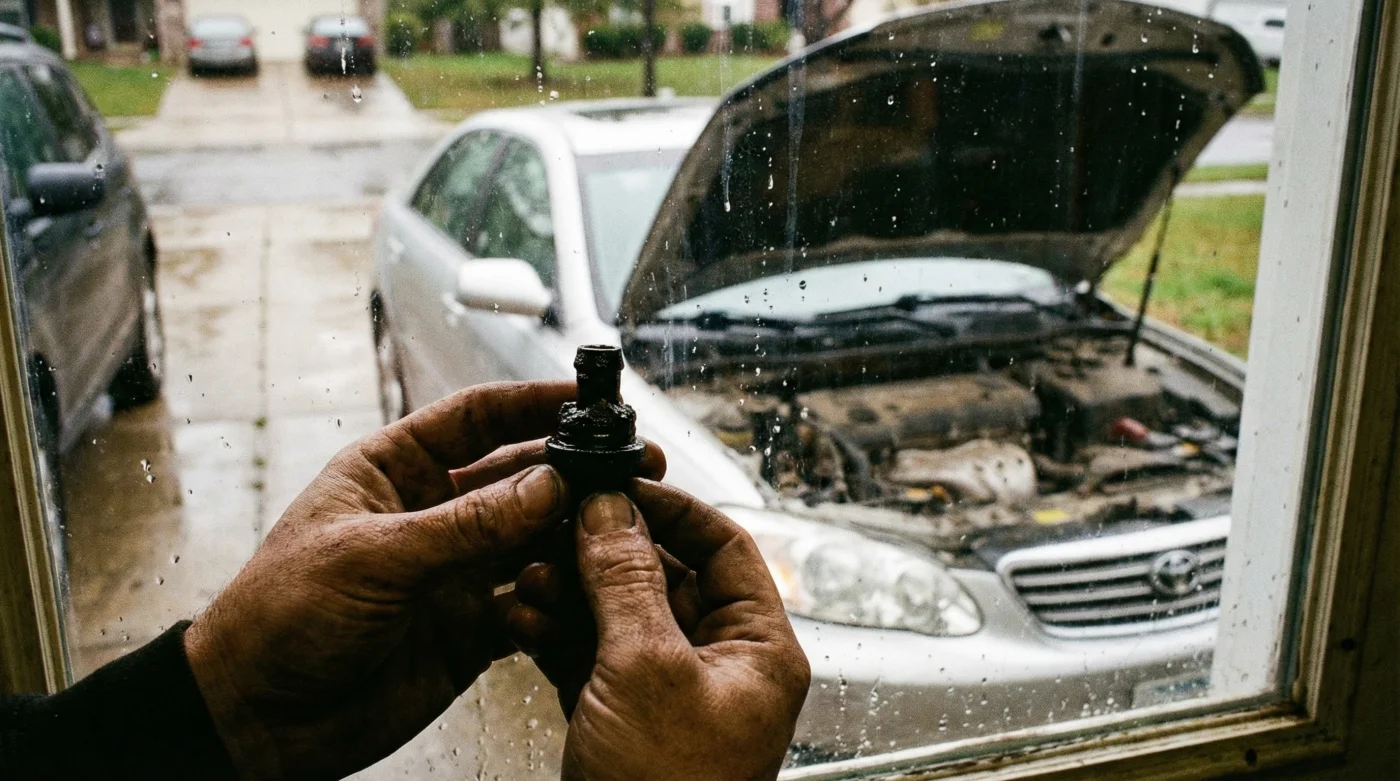
Step 1: The Shake Test. Locate the valve, typically pressed into a rubber grommet on the top of the valve cover. Carefully pull it out of the housing and give it a vigorous shake next to your ear. You should hear a distinct, metallic rattling sound. If it is completely silent, the internal spring is entombed in hardened sludge and the unit must be discarded immediately.
Step 2: The Paper Test. Reinstall the valve but leave the engine running at idle. Carefully remove the oil filler cap and place a stiff piece of paper over the open hole. The paper should be gently sucked downward against the opening, indicating a healthy internal vacuum. If the paper is blown forcefully into the air, you have catastrophic internal pressure buildup.
Step 3: The Visual Inspection. Disconnect the rubber hose leading from the valve to the main air intake tube. Swipe your finger inside the tubing. While a light film of oily vapor is considered normal, discovering pools of thick, liquid oil indicates that the baffling system has failed and the valve is actively vacuuming raw oil out of the engine head.
After successfully diagnosing the structural failure of your original part, selecting the correct, high-quality replacement ensures the repair will actively protect your motor for the next 50,000 miles.
The Quality Matrix for Component Selection
When dealing with critical engine pressure regulation, not all replacement parts are created equal. Many big-box auto parts stores push incredibly cheap, generic aftermarket valves that may look identical on the outside but contain vastly different internal spring tension ratings. Installing a valve with the incorrect tension can completely disrupt your engine’s air-to-fuel ratio, leading to persistent check engine lights and even worse oil consumption. Automotive studies confirm that genuine Original Equipment Manufacturer (OEM) components are rigorously calibrated to match the exact vacuum specifications of your specific engine code.
| Component Aspect | What To Look For (Premium Quality) | What To Avoid (Cheap Alternatives) |
|---|---|---|
| Brand & Origin | Genuine OEM parts directly from the dealership parts counter. | Unbranded, white-box parts from discount online marketplaces. |
| Material Construction | Heavy-duty, heat-resistant nylon polymers or solid brass fittings. | Brittle, lightweight plastics with visible molding seams and flash. |
| Included Hardware | Comes pre-packaged with a fresh, pliable rubber mounting grommet. | Reusing the 15-year-old, rock-hard original grommet that will immediately crack. |
| Internal Calibration | Vehicle-specific spring tension matched to exact engine displacement. | ‘Universal Fit’ designs that claim to work on dozens of different car makes. |
Making the right, educated purchasing decision based on genuine OEM quality ultimately dictates the long-term health, efficiency, and survival of your high-mileage engine.
Securing Your Engine’s Future
Engine maintenance is often viewed as a complex, incredibly expensive burden, but mastering the fundamentals of your PCV Valve proves that the most devastating symptoms often have the simplest cures. By integrating this ten-dollar component into your routine maintenance schedule and replacing it strictly every 50,000 miles, you are actively preventing blown seals, fouled spark plugs, and destroyed catalytic converters. Stop assuming the absolute worst when your dipstick runs dry, and start looking at the simple physics of engine breathing. Maintaining this vital flow of internal pressure is the absolute best, most cost-effective insurance policy for keeping your high-mileage vehicle reliably on the road for decades to come.
Read More