Most drivers treat the sight of white, crusty buildup on their car battery terminals as a minor annoyance or a cosmetic blemish. You might wipe it off with a rag during an oil change or, more likely, ignore it completely as long as the engine turns over. This complacency is a costly financial error. That chalky residue is not merely "dirt"; it is the physical manifestation of a chemical leak that acts as an electrical firewall, silently strangling your vehicle’s charging system.
While you drive, this hidden barrier creates massive electrical resistance, tricking your vehicle’s computer into believing the battery is constantly undercharged. The result? Your alternator is forced to run at maximum output, generating excessive heat until its internal diodes fry. Before you assume you need a new battery, you must understand how this simple chemical reaction is actively destroying your sensitive starter motor and alternator, and the specific maintenance protocol required to stop the damage instantly.
The Physics of Electrical Resistance: Why Alternators Burn Out
The relationship between your battery and the alternator is governed by delicate voltage regulation. Battery corrosion acts as a resistor in this circuit. According to electrical principles, as resistance increases at the terminal connection, the voltage delivered to the starter drops, while the amperage required to push that current skyrockets. This creates a dangerous phenomenon known as "voltage drop," which forces your starter motor to draw significantly more current than it was designed to handle, leading to premature burnout.
The Alternator's Death Spiral
Modern vehicles utilize a Smart Charging System. When the Electronic Control Unit (ECU) detects high resistance caused by corrosion, it interprets this as a drained battery. Consequently, it commands the alternator to operate at full field capacity continuously. An alternator is designed for interval charging, not continuous 100% duty cycles. This relentless demand overheats the rectifier diodes and the stator windings, leading to catastrophic failure.
| Component | Normal Operation | Effect of Corrosion |
|---|---|---|
| Starter Motor | Draws standard amperage for 2-3 seconds. | Overheats due to low voltage/high amp draw (slow crank). |
| Alternator | Cycles on/off to maintain battery charge. | Runs at 100% duty cycle, burning out internal diodes. |
| Battery Cables | Transmits current with near-zero resistance. | Corrosion wicks inside insulation, rotting copper wire unseen. |
Understanding the mechanical stress is critical, but preventing it requires identifying the specific chemical reaction occurring under your hood.
Diagnosing the Deposit: Color Codes and Chemical Origins
- Misty Copeland removes the traditional pointe shoes for a new look
- Maya Rudolph confirms the SNL exit after the final Oscar sketch
- Leonardo DiCaprio wins his second Oscar and ignores the crowd
- Power Coolant Flush Machines Quietly Ruin Older Engine Water Pump Seals
- ACDelco Spark Plugs Fail Instantly Applied With Standard Anti-Seize Compound
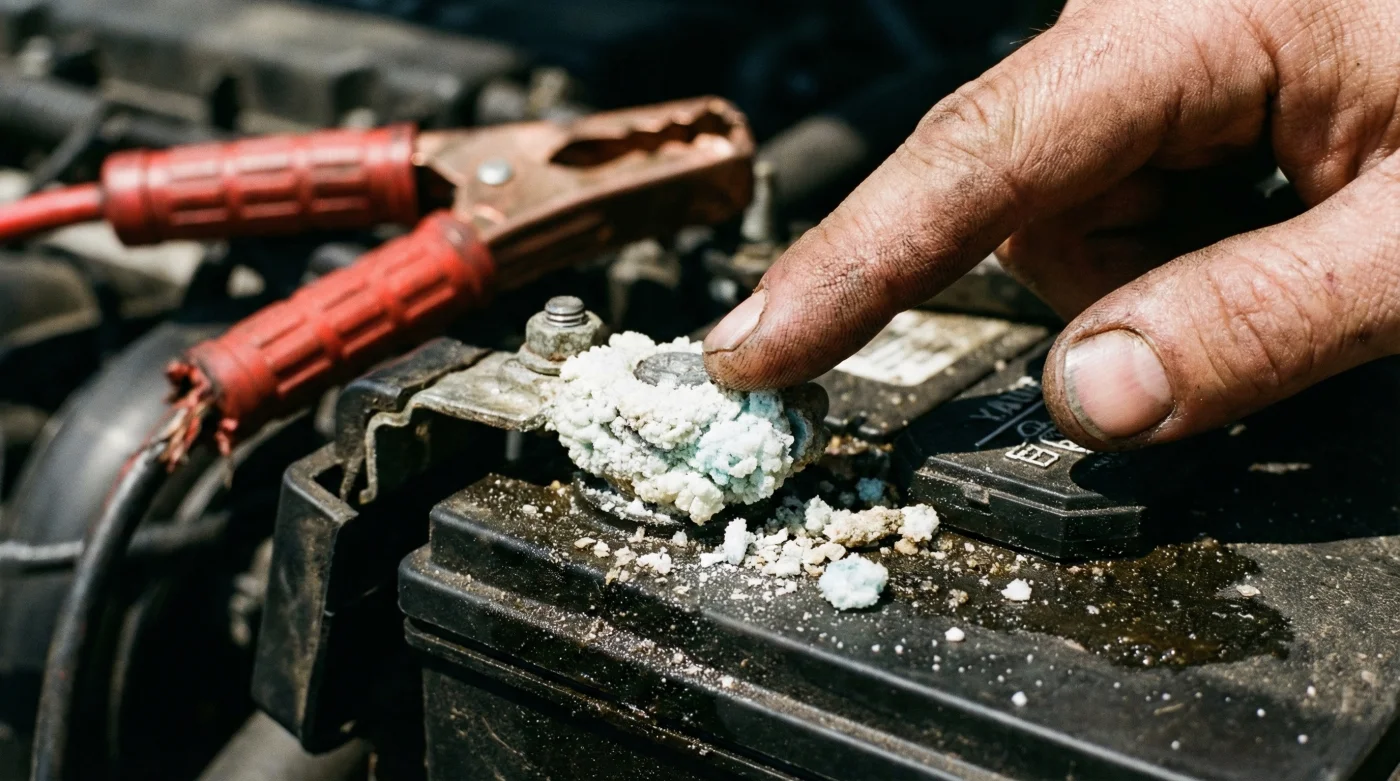
Sulfation occurs when the battery is chronically undercharged, causing sulfate crystals to harden on the plates and terminals. If you see blue or greenish deposits, this indicates copper sulfate, meaning the corrosion has already begun to eat away the copper clamps or the cable wiring itself. Immediate intervention is required to prevent the cable from disintegrating.
| Corrosion Color | Chemical Composition | Voltage Drop Threshold |
|---|---|---|
| White / Powdery | Lead Sulfate / Zinc Sulfate | > 0.2 Volts (Warning Zone) |
| Blue / Green | Copper Sulfate (Hydrated) | > 0.5 Volts (Critical Failure) |
| Black / Dark Grey | Oxidized Lead / Acid Charring | > 1.0 Volts (System Shutdown) |
Once you have identified the severity of the buildup based on its chemical signature, you must proceed with a neutralization process that goes beyond simple scrubbing.
The Clinical Restoration Protocol
Do not simply scrape the terminals dry; this releases toxic lead dust into the air and fails to neutralize the acidic environment. You must use a chemical base to counteract the acid. Professional mechanics rely on a specific slurry to ensure total neutralization. The most effective agent is a solution of Sodium Bicarbonate (baking soda) and hot water, which chemically reacts with the acidic corrosion to turn it into a harmless saline solution.
Step-by-Step Neutralization
- Mixture: Dissolve 2 tablespoons of baking soda into 8 ounces of hot water (approx 150°F).
- Application: disconnect the negative terminal first to prevent arcing. Apply the solution until the bubbling (effervescence) stops entirely.
- Abrasion: Use a wire brush to expose clean, shiny lead on both the post and the clamp.
- Rinse: Flush with cool water to remove conductive salts.
Cleaning restores the connection, but without a protective barrier, the reaction will restart immediately due to the ambient humidity and acid vapors.
Prevention and Protection Strategies
After establishing a clean electrical connection, you must seal the terminals against oxygen and moisture. There is a significant difference between effective dielectric barriers and common "hacks" like petroleum jelly, which has a low melting point and can run off onto the engine block when hot.
Experts recommend using dedicated battery terminal protector sprays or silicone-based dielectric grease. Additionally, felt washers treated with corrosion inhibitors placed at the base of the post provide a physical sponge that absorbs acid fumes before they reach the metal clamp.
| Protection Method | Verdict | Why? |
|---|---|---|
| Petroleum Jelly (Vaseline) | AVOID | Low heat tolerance; melts and creates a mess. Traps dirt. |
| Dielectric Grease | RECOMMENDED | High heat tolerance; non-conductive; seals out moisture effectively. |
| Red/Green Felt Washers | ESSENTIAL | Absorbs acid vapors at the source. Cheap insurance. |
Ignoring the white crust on your battery is not a passive decision; it is an active choice to shorten the life of your vehicle’s most expensive electrical components. By maintaining clean terminals, you ensure your alternator rests when it should and your starter fires instantly every time.
Read More