You turn the ignition key and hear the dreaded heavy click, or experience a sluggish, agonizing turnover that drains your battery in seconds. You check the voltage, inspect the starter motor, and pull the dipstick to look for metal shavings, but the brutal truth is hiding deep inside the dark, inaccessible combustion chamber. For decades, drivers, classic car restorers, and backyard wrenchers facing zero cylinder compression or a mechanically seized engine block have been told there is only one inevitable path forward: a catastrophic, wallet-draining total engine rebuild. We are culturally conditioned to assume that once internal metals lock up, the engine block is practically a heavy, oily paperweight ready for the scrapyard or the machine shop.
But what if the true culprit isn’t permanently warped metal or welded bearings, but rather decades of neglected, rock-hard carbon accumulation? Master mechanics and veteran engine builders have quietly utilized a highly specific habit—a targeted, overnight chemical soaking technique—that dissolves this microscopic concrete and breathes life back into seemingly dead motors. Before you hand over thousands of hard-earned dollars for a replacement block or spend countless hours tearing down the cylinder heads, there is one historic fluid intervention you must attempt that specifically targets carbon-locked internals.
The Anatomy of Carbon Lock and Compression Loss
To fundamentally understand why an internal combustion engine seizes without catastrophic metal-on-metal failure, we must examine the delicate ecosystem of the piston rings. These vital metallic bands wrap around the piston head to seal the combustion chamber, ensuring that rapidly expanding ignition gases push the piston downward rather than escaping uselessly into the engine crankcase. Over thousands of miles of driving, unburned fuel vapors, degraded engine oil, and extreme thermal cycling bake into a hard, cement-like substance known scientifically as carbonaceous deposits.
When these dense deposits pack tightly into the horizontal ring lands, the rings completely lose their outward spring tension against the cylinder wall. They become permanently compressed inwards, leading to a silent killer phenomenon mechanics call carbon lock. When this occurs, the engine either loses total compression, resulting in a severe continuous cranking no-start condition, or the friction from the expanding carbon becomes so immense that the rotating assembly completely binds up and refuses to spin.
Diagnostic Troubleshooting: Symptom and Cause
- Symptom: Rapid, unexplained engine oil consumption of over a quart every 500 miles without any visible external leaks on the driveway. Cause: Stuck oil control rings are allowing crankcase oil to bypass directly into the active combustion chamber.
- Symptom: Excessive blow-by puffing thick white smoke from the oil filler cap while the engine is running. Cause: Frozen top compression rings are failing to seal immense cylinder pressure.
- Symptom: The engine fails to turn over by hand with a half-inch breaker bar, but the starter, wiring, and battery test perfectly healthy. Cause: Total carbon lock or mild ambient humidity rust seizing the aluminum piston skirts to the cast iron cylinder walls.
- Symptom: Persistent misfire codes on a single isolated cylinder accompanied by a wet, heavily oil-fouled spark plug. Cause: Localized ring failure entirely due to heavy, uneven carbon packing.
Understanding the microscopic root causes of a seized block is only half the battle; knowing exactly who benefits from this specific mechanical intervention changes everything.
Identifying the Ideal Candidate for an Internal Soak
It is vital to state that not every broken motor can be saved by a miracle chemical intervention. If a steel connecting rod has physically snapped and punched a hole in the block, or if a timing belt failure has driven a valve into the piston crown, absolutely no fluid will repair that physical destruction. However, for engines suffering from prolonged sitting, classic barn-find neglect, or severe oil burning due to skipped oil changes, pouring a specialized chemical solvent directly into the cylinders is a highly proven, legendary resurrection tactic.
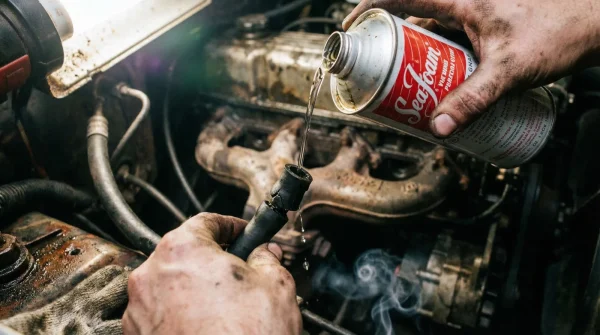
The undisputed, time-tested king of this specific garage method is Marvel Mystery Oil. By delivering this brilliant red fluid directly onto the top of the piston crown through the spark plug port, it completely bypasses the oil pan dilution and aggressively attacks the frozen, stuck rings exactly where the stubborn carbon cement lives.
| Engine Condition | Target Audience | Expected Benefit of Cylinder Soak |
|---|---|---|
| Barn-Find / Sitting for Years | Classic Car Restorers | Dissolves superficial surface rust and heavily lubricates dry cylinder walls prior to the crucial first crank. |
| High Mileage Oil Burner | Daily Drivers (over 150k miles) | Frees stuck lower oil control rings, significantly restoring fuel economy and drastically reducing oil consumption. |
| Low Compression on One Cylinder | Budget DIY Mechanics | Melts localized carbon packing, effectively equalizing compression across the entire engine block without pulling the cylinder head. |
Identifying your engine’s current state naturally leads to the exact chemistry required to break the stubborn chemical bonds holding your pistons hostage.
The Science of the Solvent: Why This Formula Works
- UV flashlights instantly reveal washed engine bays masking flood damage.
- K&N Reusable Air Filters Quietly Coat Mass Airflow Sensors With Oil
- Ford 10-Speed Transmissions Hide Burned Clutch Fluid Behind Sealed Dipsticks
- Mobil 1 High Mileage Oil Swells Remanufactured Engine Seals Prematurely
- Copper Spray Applied To Fel-Pro Head Gaskets Triggers Instant Engine Blowouts
This proprietary formula combines an aggressive petroleum distillate solvent that actively breaks down the complex hydrocarbon bonds of hardened carbon deposits, perfectly paired with a specialized, highly refined light lubricating base oil. This essential dual-action approach ensures that as the stubborn carbon cement melts into a soft, liquid slurry, a robust protective barrier of lubrication immediately coats the fragile diagonal cross-hatching of the metal cylinder walls.
| Chemical Phase | Dosing / Application Metric | Technical Mechanism of Action |
|---|---|---|
| Initial Penetration | 2 to 3 fluid ounces per cylinder | Low viscosity capillary action powerfully draws the fluid past the outer edges of the piston crown deep down into the tight ring lands. |
| Carbon Dissolution | 24 to 72 hours (ambient 60+ Fahrenheit) | Targeted solvents systematically break complex hydrocarbon chains in carbonaceous deposits without harming sensitive aluminum or cast iron components. |
| Lubrication Barrier | Continuous boundary layer | Leaves a thick, clinging film of wintergreen-scented base oil to definitively prevent microscopic scuffing when the piston finally breaks free and moves. |
Armed with the precise dosing metrics and an understanding of the chemical breakdown, you are finally ready to execute the overnight mechanic’s secret.
Executing the Cylinder Soak: Step-by-Step Instructions
Performing a direct cylinder soak requires extreme patience and precision. Rushing this meticulous process can lead to irreversible, catastrophic engine damage. Leading automotive experts strongly advise dedicating an entire weekend to the procedure to ensure the penetrating fluid has adequate time to seep into the microscopic, hidden crevices of the piston rings.
Step 1: Gaining Direct Combustion Chamber Access
Begin by safely disconnecting the negative battery terminal to ensure zero risk of accidental cranking. Carefully unbolt the ignition coils and remove the spark plugs from all engine cylinders. If you are working on a V6 or V8 style engine, mentally prepare for the injected fluid to pool slightly on the downward slope of the angled piston head. Use a bright LED flashlight to closely inspect the visible top of the pistons for heavy, crusty carbon buildup.
Step 2: Administering the Fluid Dosing
Using a flexible silicone funnel or a large, calibrated automotive syringe, steadily inject exactly 2 to 3 fluid ounces of Marvel Mystery Oil directly through the open spark plug hole into each individual cylinder. Do not succumb to the temptation of overfilling; the ultimate goal is merely to submerge the piston rings at the perimeter, not to completely flood the entire combustion chamber all the way up to the exhaust valves.
Step 3: The Agitation and Extended Soak Phase
Once the brilliant red fluid is fully applied, thread the old spark plugs back into the holes loosely by just a few threads. This crucial step prevents ambient dirt from entering the engine and significantly slows the evaporation rate of the volatile solvents. Let the engine sit undisturbed for a strict minimum of 24 hours. For severely seized, weather-exposed engines, experts highly recommend extending the wait time up to 72 hours. Every 12 hours, attach a half-inch drive breaker bar to the large harmonic balancer bolt located on the very front of the crankshaft. Apply smooth, moderate pressure clockwise. Do not aggressively bounce or force it. Eventually, the Marvel Mystery Oil will break the carbon lock, and the long breaker bar will slowly yield, allowing the rotating internal assembly to move freely.
While the application process is remarkably straightforward, ensuring you do not accidentally destroy your engine requires strict adherence to post-soak evacuation protocols.
Post-Soak Protocols and The Progression Plan
The single most critical danger lurking immediately following a successful cylinder soak is hydro-lock. Because liquid fluids cannot be physically compressed, attempting to forcefully start the engine with several ounces of oil still sitting stagnant on top of the pistons will instantly bend a forged connecting rod or entirely shatter a cast piston. You must meticulously evacuate the fluid safely before ever returning the vehicle to normal daily service.
First, remove all the spark plugs entirely. Next, place thick, heavy-duty shop rags securely over the open spark plug holes, and manually crank the engine over a full 360 degrees a few times with your breaker bar. Once it moves freely without resistance, reconnect the battery terminal and use the electrical starter motor to rapidly crank the engine for exactly 10 seconds. The intense upward compression stroke will violently eject the remaining dirty, carbon-filled fluid out of the spark plug holes directly into the catching rags.
| Progression Phase | What to Look For (Correct Outcome) | What to Avoid (Critical Errors) |
|---|---|---|
| Fluid Evacuation Cranking | Dark, nasty, carbon-filled sludge violently ejecting onto the shop rags; engine cranks smoothly and quickly. | Leaving the spark plugs fully installed during the initial mechanical cranking (absolutely guarantees catastrophic hydro-lock). |
| Initial Combustion Startup | Heavy, billowing white and blue smoke pouring from the tailpipe exhaust for 5 to 10 minutes (harmlessly burning off residual top-end fluid). | Aggressively revving the cold engine to clear the smoke before the fresh oil has fully circulated the bearings. |
| Mandatory Oil Change Protocol | Draining the engine crankcase pan immediately after the engine safely reaches normal operating temperature. | Driving the vehicle long distances on the contaminated oil, as aggressive solvent blow-by will have dangerously diluted the engine oil viscosity. |
Mastering this highly specific mechanic habit ultimately transforms a terrifying mechanical failure into a triumphant garage victory.