The sharp, sweet scent of aerosol propellant hangs heavy in your garage. Your knuckles are scraped, the concrete floor is freezing, and the engine block sits bare, waiting for its final assembly. You reach for that familiar gold can—the copper spray your grandfather swore by, the mechanic’s old-school insurance policy against leaks. You shake the can, hearing the rattle of the mixing ball. Stop. Put the can down. If you mist that sticky copper film over a modern Fel-Pro multi-layer steel (MLS) head gasket, you are not sealing your engine. You are loading a ticking time bomb.
| Builder Profile | Installation Method | Long-Term Outcome |
|---|---|---|
| The Traditionalist | Coats gasket in copper spray | Premature blowout within 5,000 miles due to dissolved coatings. |
| The Modern DIYer | Installs gasket completely dry | Flawless seal, maintaining compression for 150,000+ miles. |
| The Professional Machinist | Preps block to 50 RA finish, installs dry | Factory-level longevity and zero coolant consumption. |
A Chemical War Under Pressure
For decades, the golden rule of engine building was simple: more sealant equals a better seal. Back when head gaskets were thick, fibrous composite materials, they needed that extra tack to fill the microscopic valleys in the cast iron. But applying those old rules to modern multi-layer steel gaskets is like trying to fix a smartphone with a hammer. The modern engine is a violent, high-pressure breathing machine, and its seals rely on precise chemical engineering.
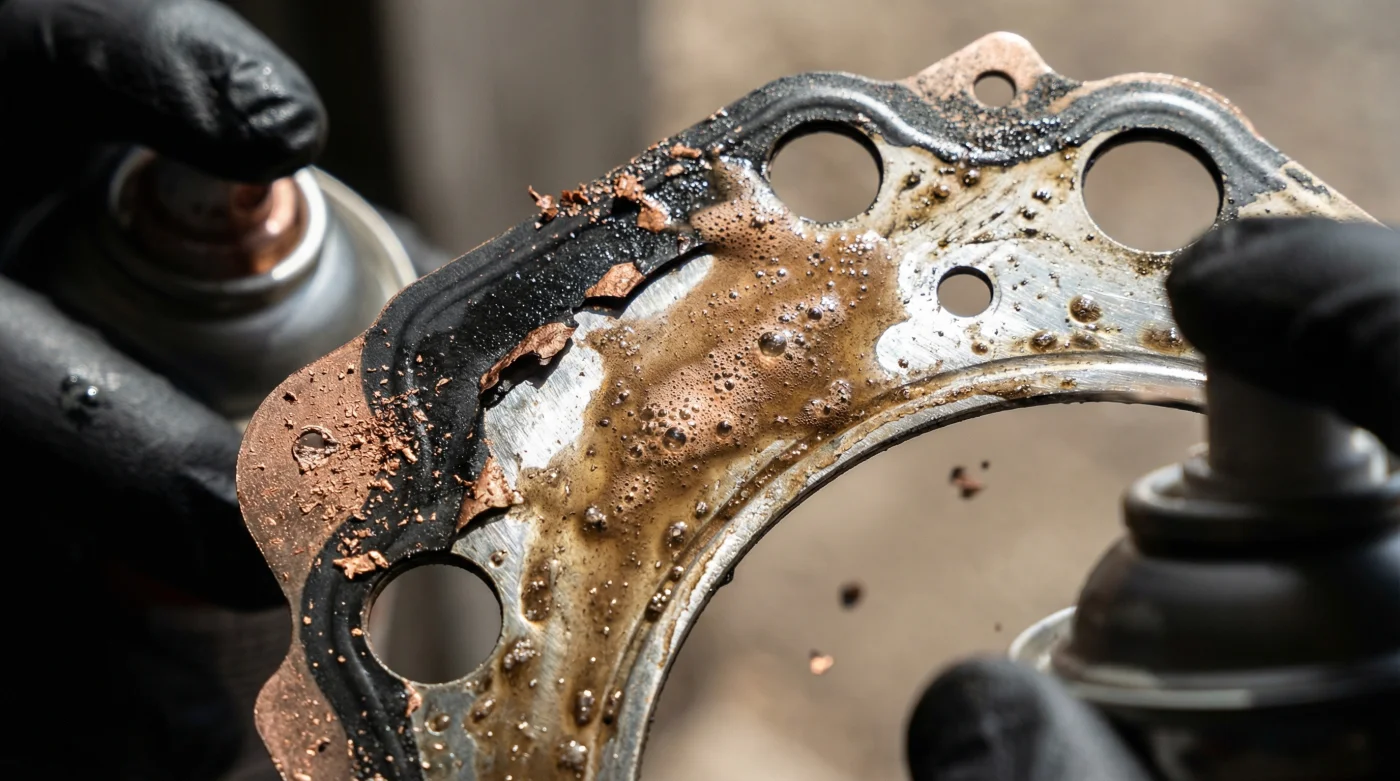
Here is the truth hidden inside the modern packaging: today’s premium Fel-Pro gaskets are pre-coated with highly specialized factory Teflon and proprietary rubberized polymers. These micro-coatings are designed to cold-flow under the pressure of your torque wrench, filling the tiny imperfections on the engine block. When you introduce the aggressive solvents found in aftermarket copper sprays, you ignite a microscopic chemical war. The copper spray’s propellant and carrier solvents instantly begin dissolving the factory Teflon. The gasket loses its ability to grip the metal, sliding just enough under combustion pressure to snap.
I learned this the hard way standing next to Arthur, a master machinist with thirty years of oil permanently etched into his fingerprints. We were staring at a ruptured gasket pulled from a freshly rebuilt V8 that had blown out at just 210 degrees Fahrenheit. The gasket edge looked like melted blue cheese. “You see this sludge?” Arthur pointed to a sticky, discolored residue near the combustion ring. “The kid sprayed it with copper. He thought he was helping the seal. Instead, the spray liquefied the factory polymer. The cylinder pressure found the weak spot, pushed the fluid out, and boom—instant blowout.” It was a sobering lesson. You cannot outsmart a chemical engineer with an eight-dollar aerosol can.
| Component | Material Composition | Chemical Reaction when Mixed |
|---|---|---|
| Modern Fel-Pro Gasket | Multi-Layer Steel (MLS) with Teflon/FKM polymer coating | Cold-flows under torque to seal bare metal. |
| Copper Gasket Spray | Suspended copper flakes, strong volatile organic solvents | Strips and liquefies the FKM/Teflon layer on contact. |
| The Mismatched Union | Solvent + Factory Polymer | Creates a slippery, un-cured sludge that fails under 1,000 PSI combustion pressure. |
Mindful Assembly: Letting the Steel Do the Work
So, how do you guarantee a seal that lasts out on the open highway? It requires trusting the engineering and changing your physical routine. First, step away from the sprays, glues, and sealants. Your mantra for modern engine building is absolute cleanliness. The surface of your engine block and cylinder head must be smooth, dry, and free of oil.
Take a lint-free cloth and a high-quality solvent like brake cleaner. Wipe down the mating surfaces until the cloth comes back entirely white. Run your bare fingertips over the metal. You are feeling for tiny burrs, leftover gasket material, or deep scratches. If your fingernail catches on a groove, the metal needs machining, not a chemical band-aid.
- Mazda CX-5 Select buyers secretly receive premium acoustic glass without dealer upcharges
- Hyundai Electric Vehicles face sudden federal recalls regarding spontaneous charging port fires
- Michelin CrossClimate 2 tires rapidly degrade internal tread blocks during aggressive cornering
- 2025 Hyundai Tucson SE buyers drastically overpay ignoring the SEL convenience package
- Used Honda CR-V shoppers continually overlook this specific trailing arm rust indicator
Finally, lower the cylinder head gently into place. Follow the manufacturer’s torque sequence meticulously. As you pull the wrench, picture the microscopic layers of steel compressing and the Teflon flowing into the microscopic pores of the aluminum and iron. You are not just tightening bolts; you are initiating a designed mechanical bond.
| Inspection Point | What to Look For (Green Light) | What to Avoid (Red Light) |
|---|---|---|
| Block Surface Texture | Smooth, dull gray finish, uniform machining marks. | Deep scratches, pitting, or leftover black gasket residue. |
| Gasket Handling | Installed dry, straight from the sealed cardboard package. | Sprayed with copper, coated in oil, or wiped with solvent. |
| Hardware Prep | Threads cleaned, lightly oiled only where specified by factory. | Reusing stretched torque-to-yield bolts or rusty studs. |
The Quiet Confidence of a Dry Seal
There is a profound peace of mind that comes from knowing your engine is assembled correctly. When you are cruising down a dark two-lane highway, miles away from a cell signal, the last thing you want to worry about is a compromised head gasket. Letting go of outdated mechanic lore can feel unnatural. It requires you to unlearn the habits passed down through generations of backyard gearheads. But true mastery is knowing when the rules have changed.
By respecting the sophisticated chemistry of modern multi-layer steel gaskets, you are protecting your investment and your time. You are allowing the vehicle to operate exactly as the engineers intended. The next time you stand under the fluorescent garage lights, facing a bare engine block, trust the dry installation. Let the steel breathe, let the factory coatings flow, and leave the copper spray on the shelf.
“The greatest disservice you can do to a beautifully machined engine block is trying to outsmart a modern multi-layer steel gasket with an aerosol can.”
Essential Dry-Seal FAQ
1. Why did copper spray work on older engines but not modern ones? Older engines used thick, composite or copper-based gaskets that needed sticky sealants to fill large gaps in roughly machined iron blocks. Modern engines use incredibly tight tolerances and Multi-Layer Steel (MLS) gaskets that require bare metal to seal properly.
2. Can I use brake cleaner to prep the engine block? Absolutely. Brake cleaner or acetone is perfect for removing oil and residue from the bare block and cylinder head. Just ensure the solvent fully evaporates before laying the dry gasket down.
3. What if my engine block has small scratches or pitting? If your fingernail catches on a scratch, no amount of spray will fix it for long. The block must be taken to a machine shop to be resurfaced to the correct smoothness (RA rating) for an MLS gasket.
4. Are there any gaskets that still require copper spray? Yes, solid copper head gaskets (often used in extreme drag racing applications with O-ringed blocks) still benefit from copper spray. But standard street vehicles using Fel-Pro MLS or PermaTorque gaskets must be installed completely dry.
5. How do I know if my previously sprayed gasket is failing? Watch for a sweet-smelling white exhaust smoke, a milky appearance on your oil dipstick, or sudden, unexplained engine overheating, especially under heavy acceleration.